


Tableau makes it easy to build incredible business dashboards, but getting a few settings right from the start will make the process even smoother. By default, Tableau is designed to create structured dashboards and will automatically apply a layout it thinks is most useful. This often results in tiled containers appearing as soon as you drag your first sheet onto the canvas—especially if you haven’t set up the dashboard in advance. Instead of relying on Tableau’s default settings, take these three steps to take as soon as you start a new Tableau dashboard.
1) Delete the phone layout
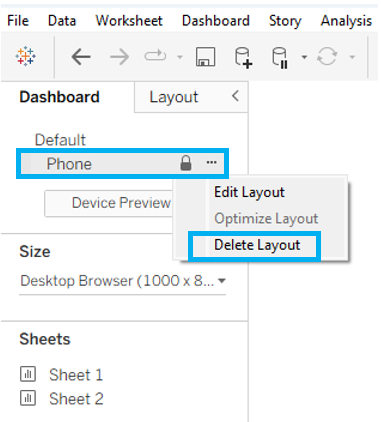
When you create a new dashboard, Tableau automatically generates two layouts: a default (desktop) layout and a phone layout. You can switch between them in the Dashboard settings panel. Since most business dashboards are viewed on desktop, the phone layout often causes more trouble than it’s worth. Mobile dashboards require custom sizing and also lack features like dynamic zone visibility. If you don’t design the phone layout yourself, Tableau will auto-generate one that looks different from your desktop version. To avoid this, simply delete the phone layout: hover over the phone tab, click the three-dot menu, and select Delete Layout.
2) Set your canvas size
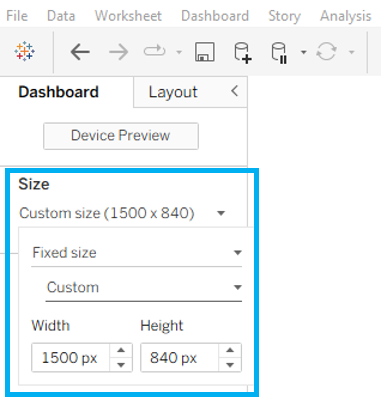
In the Dashboard settings panel under Size, you’ll find a dropdown menu to adjust your canvas dimensions. By default, Tableau sets the size to 1000px wide by 800px tall, but most business dashboards display best in a widescreen format—similar to a 16:9 PowerPoint slide. A range of 1400px–1600px wide and 800px–900px tall typically works well.
3) Float your first container
Tableau lets you place content using either tiled or floating settings. Tiled items snap into a structured layout using containers, while floating items can be positioned freely anywhere on the canvas. For most dashboard elements, you’ll want to use tiled containers to maintain a clean, consistent structure. However, your very first container should be set to floating and used to cover the full canvas.
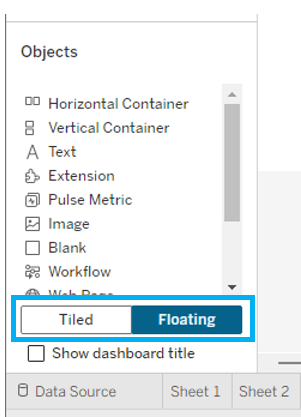
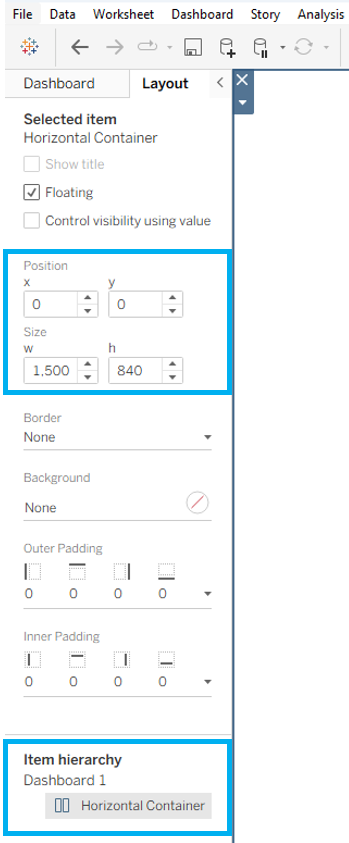
To do this, switch the setting to Floating at the bottom of the dashboard panel. Next, choose either a vertical or horizontal container to serve as the base of your dashboard and drop it into the view. (Alternatively, you can leave the setting on Tiled and hold Shift while dragging the container onto the canvas.) With the container selected, go to the Layout pane in the settings panel. Set the X and Y coordinates to 0 so the container aligns with the top-left corner of the dashboard, then adjust the Width and Height to match your chosen dashboard dimensions.
You are now all set up to begin building your view! Following these three steps will help you avoid unwanted tiled containers from the start. In the next blog, we’ll talk about some of the problems that can arise when using tiled containers and how to fix them.