


When building a data flow task in SSIS, there's a wide diversity in Tools, here I'll simply explain how to use each common tool, one at a time.
1) Aggregate:
As the name suggests this allows you to aggregate your data. You can choose which fields to group by, for our example, I'll group by City, and aggregate some sales fields as well as obtain the count distinct of Order IDs per City. When you set up an Aggregate tool you obtain this view:
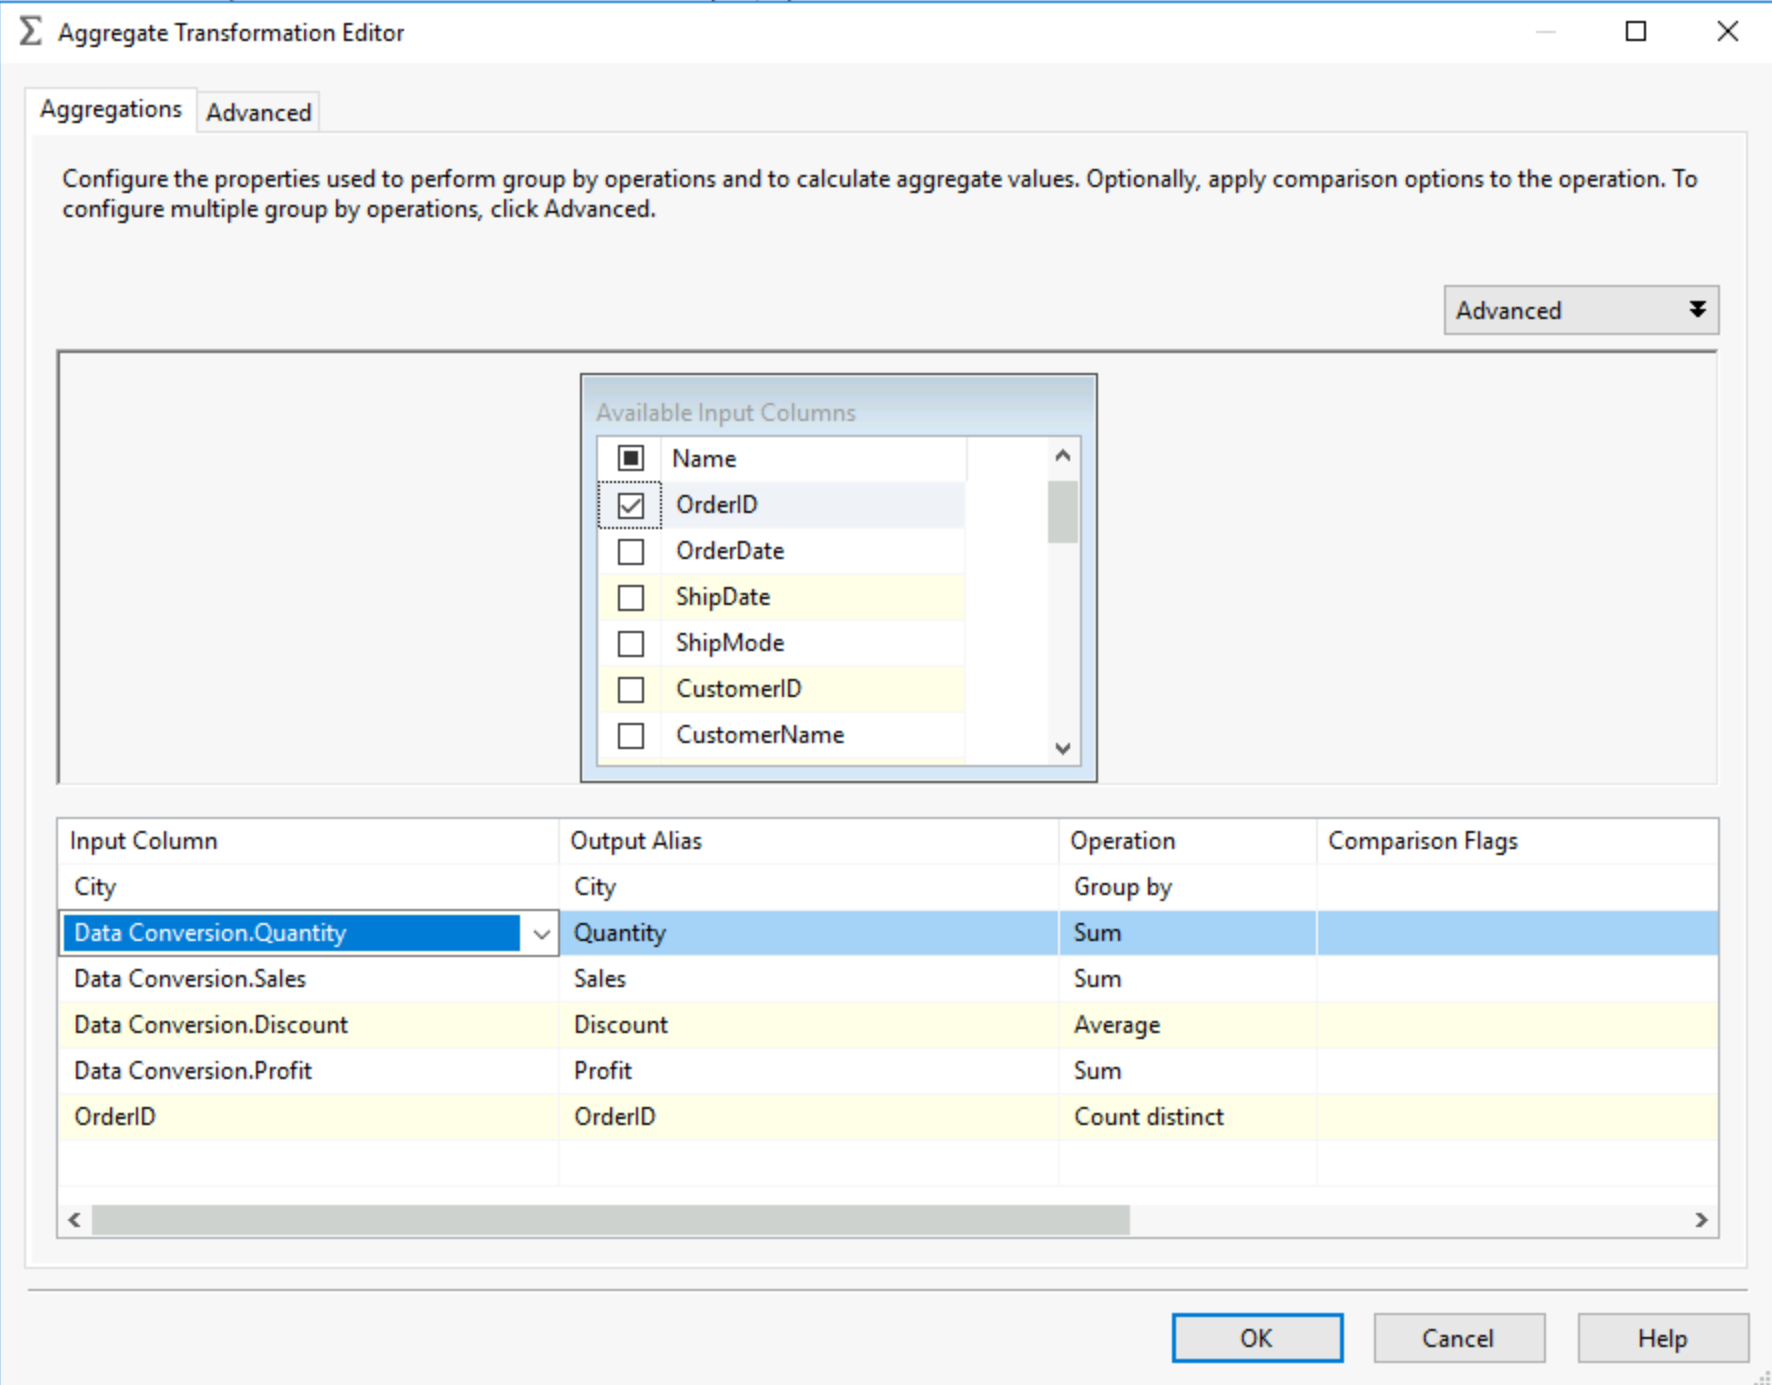
This is your aggregation pannel, you can select the fields, this is pretty intuitive but once selected, based on the data type of the field you can select methods of aggregation. You can add a field multiple times for different aggregation just make sure to rename it using the Output Alias column. For your string aggregations you can use the comparison flags, to select if you want to ignore case, ignore symboles, ignore non spacing characters and even ignore the difference between Hiragana and Katakana characters in Japanese! You also have advanced settings if you scroll to the right or select the advanced panel at the top. Essentially the Key Scale and Count Distinct Scales are use to optimise performance. The key scale estimates the number of distinct groups that will be created, therefore if you know this beforehand and set it at the right number, SSIS will allocate memory more efficiently. Same goes for the Distinct Scale but regarding the number of expected distinct values.
2) Balanced Data Distributor:
This tool does not require any set up, it will just create multiple outputs and split your data across them. This means you will be able to use parallel processing, for example instead of pushing one large data source to a table, you can split it into 4 outputs pushing into the same table, SQL server will handle the parallel process and make this process faster.
3) Conditional Split:
The conditional split acts as a filter, you can setup multiple filters leading to multiple outputs.
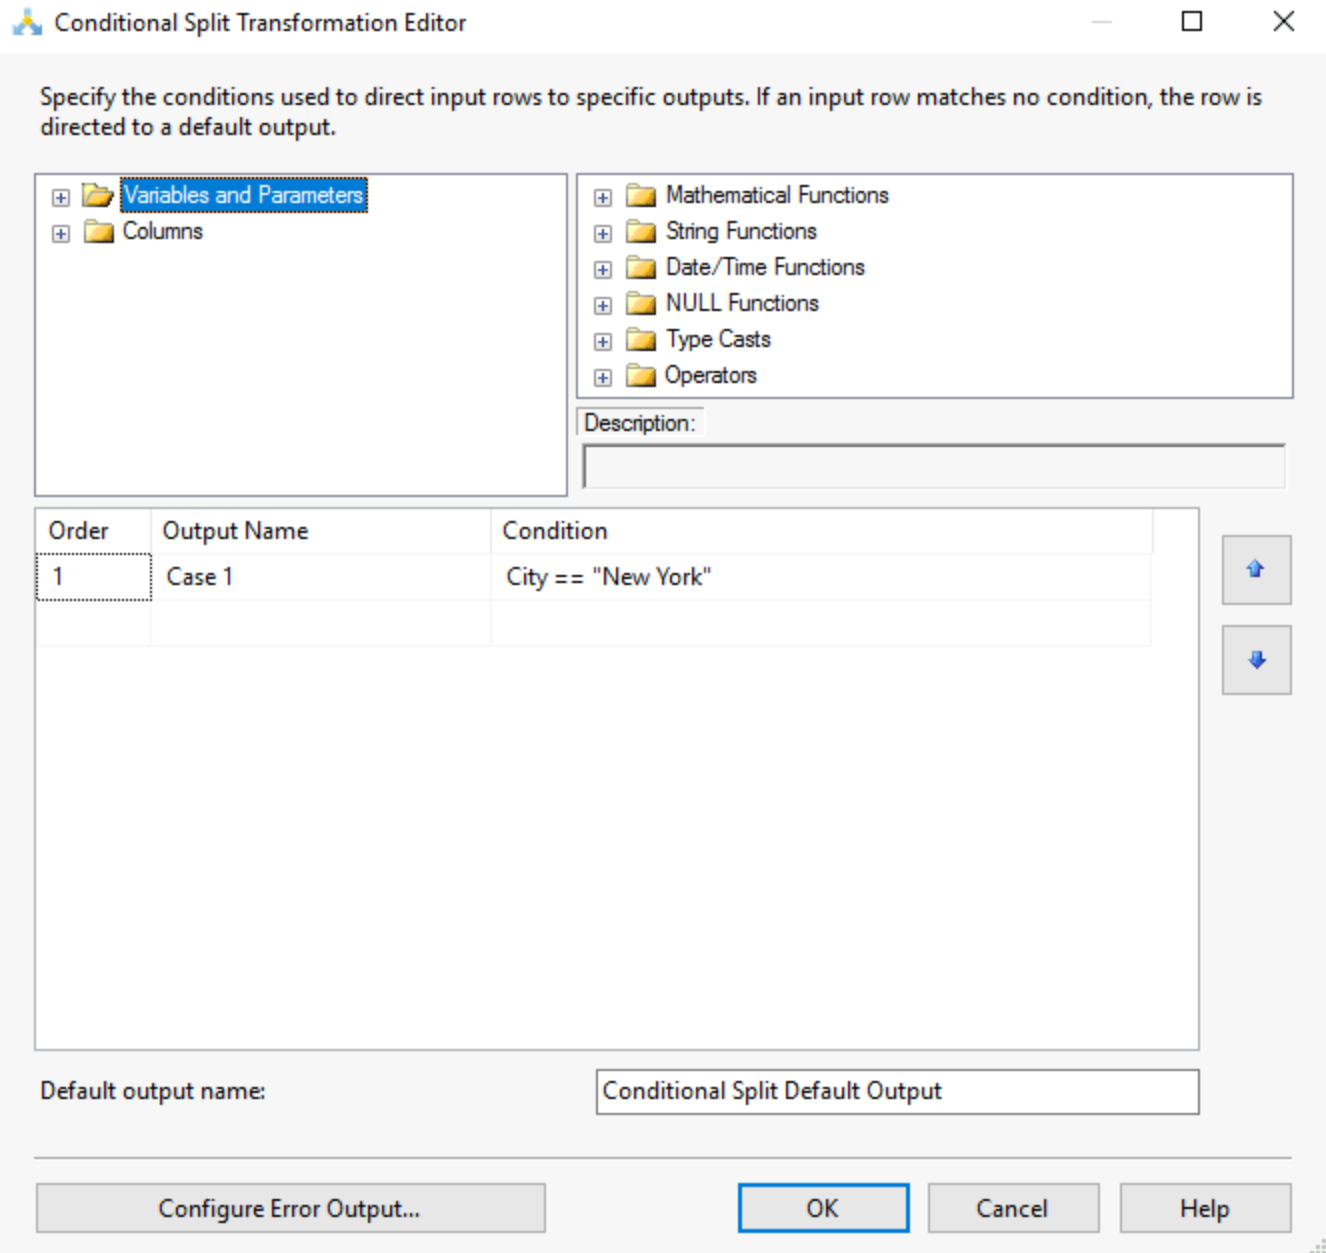
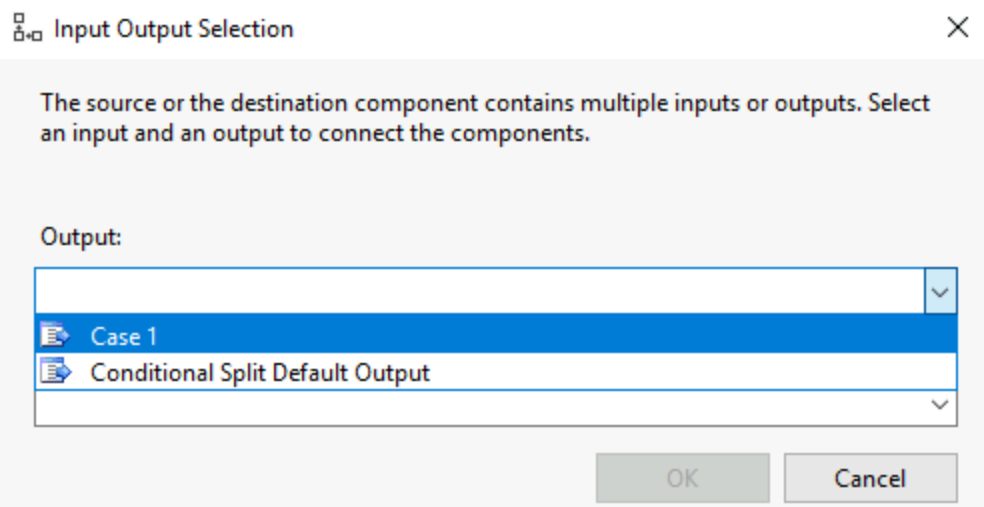
You can create your filter, give it a name in output name and set the condition. You can use the columns, variables and parameters as well as the different functions existing in SSIS to help you obtain the filtered output you want. Once you link the output arrow of this tool to another tool, you will be asked to choose with output/condition you want to use:
4) Data Conversion
This tool allows you to modify the data type of your fields, especially useful when coming from a flat file where data types are not always recognised. You can also set the length, precision and scale to optimise storage in case of special values present in the data.
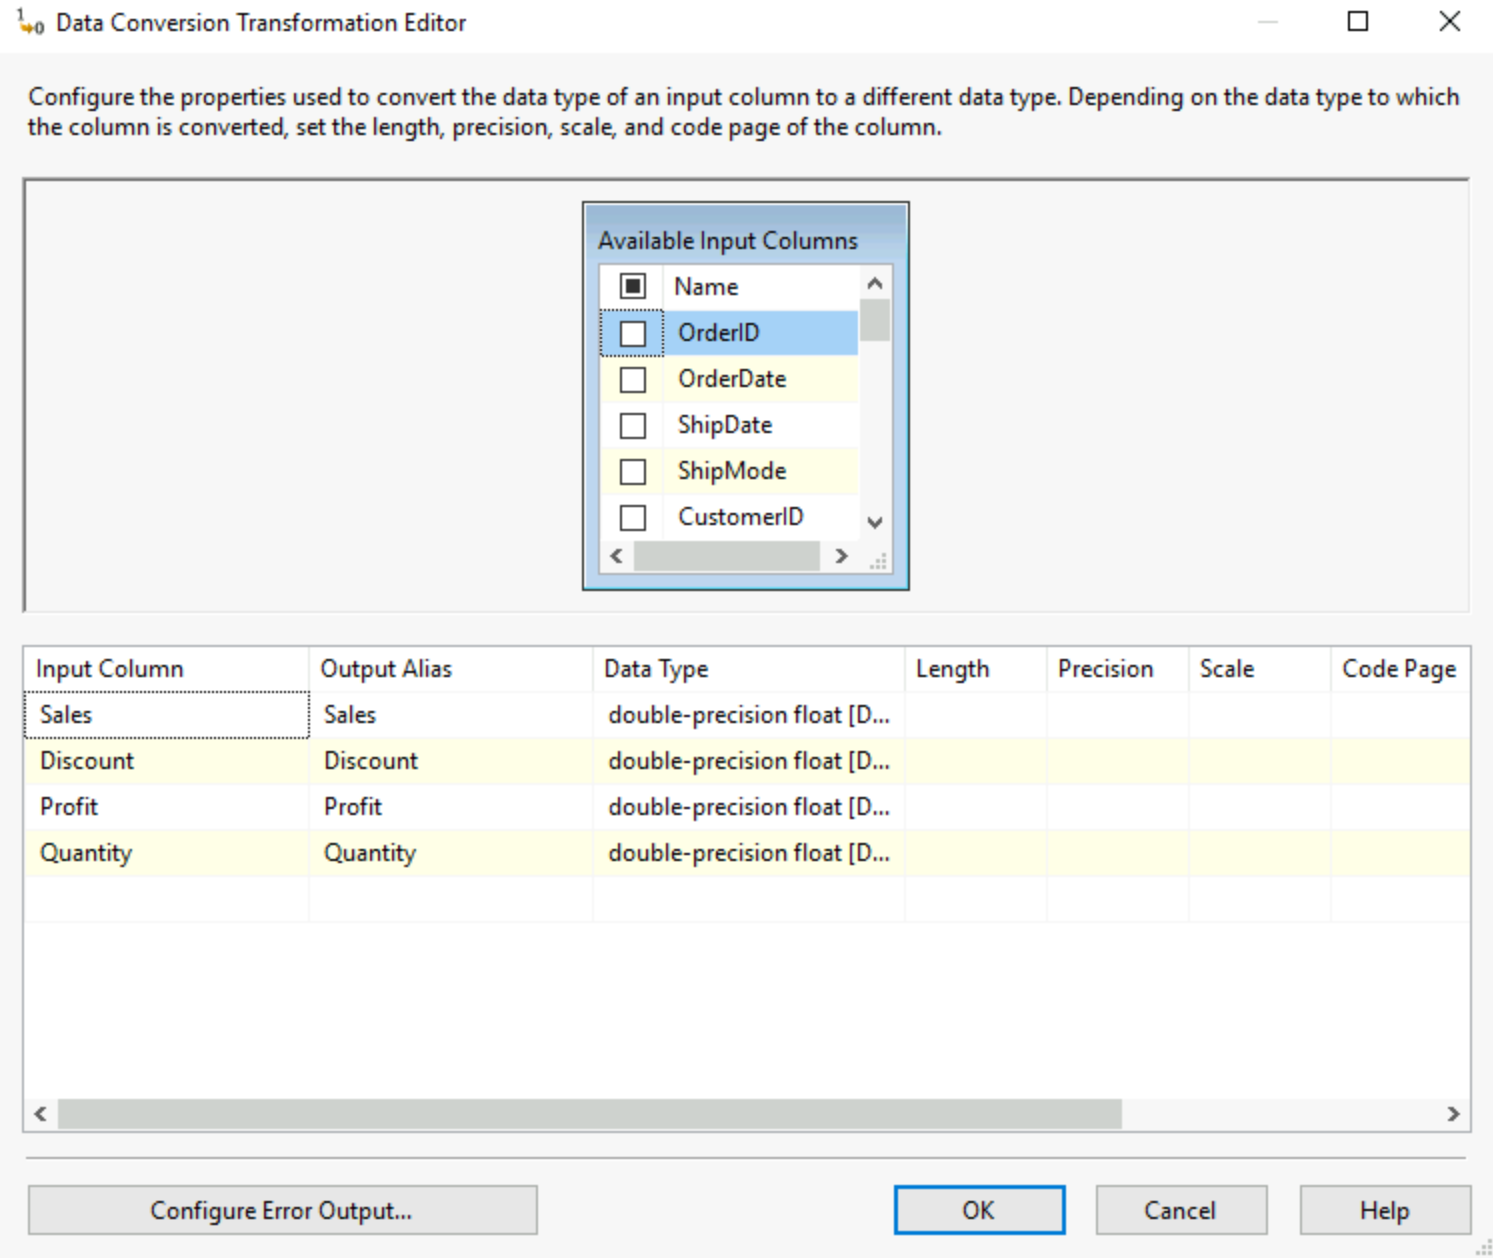
Be careful tho! If like me your output alias is the name of your column, the data conversion tool always creates a new version so you'll have source.sales and dataconversion.sales as two different fields in your data now.
5) Data Streaming Destination:
This allows SSIS to act as a live data feed, it will just streams data to a client app.
6) Derive Column:
This is the ability to code yourself the values you want to appear in a new column, give it a name, select if you want that new column as an added column or to replace any of the existing columns, the data type and more.
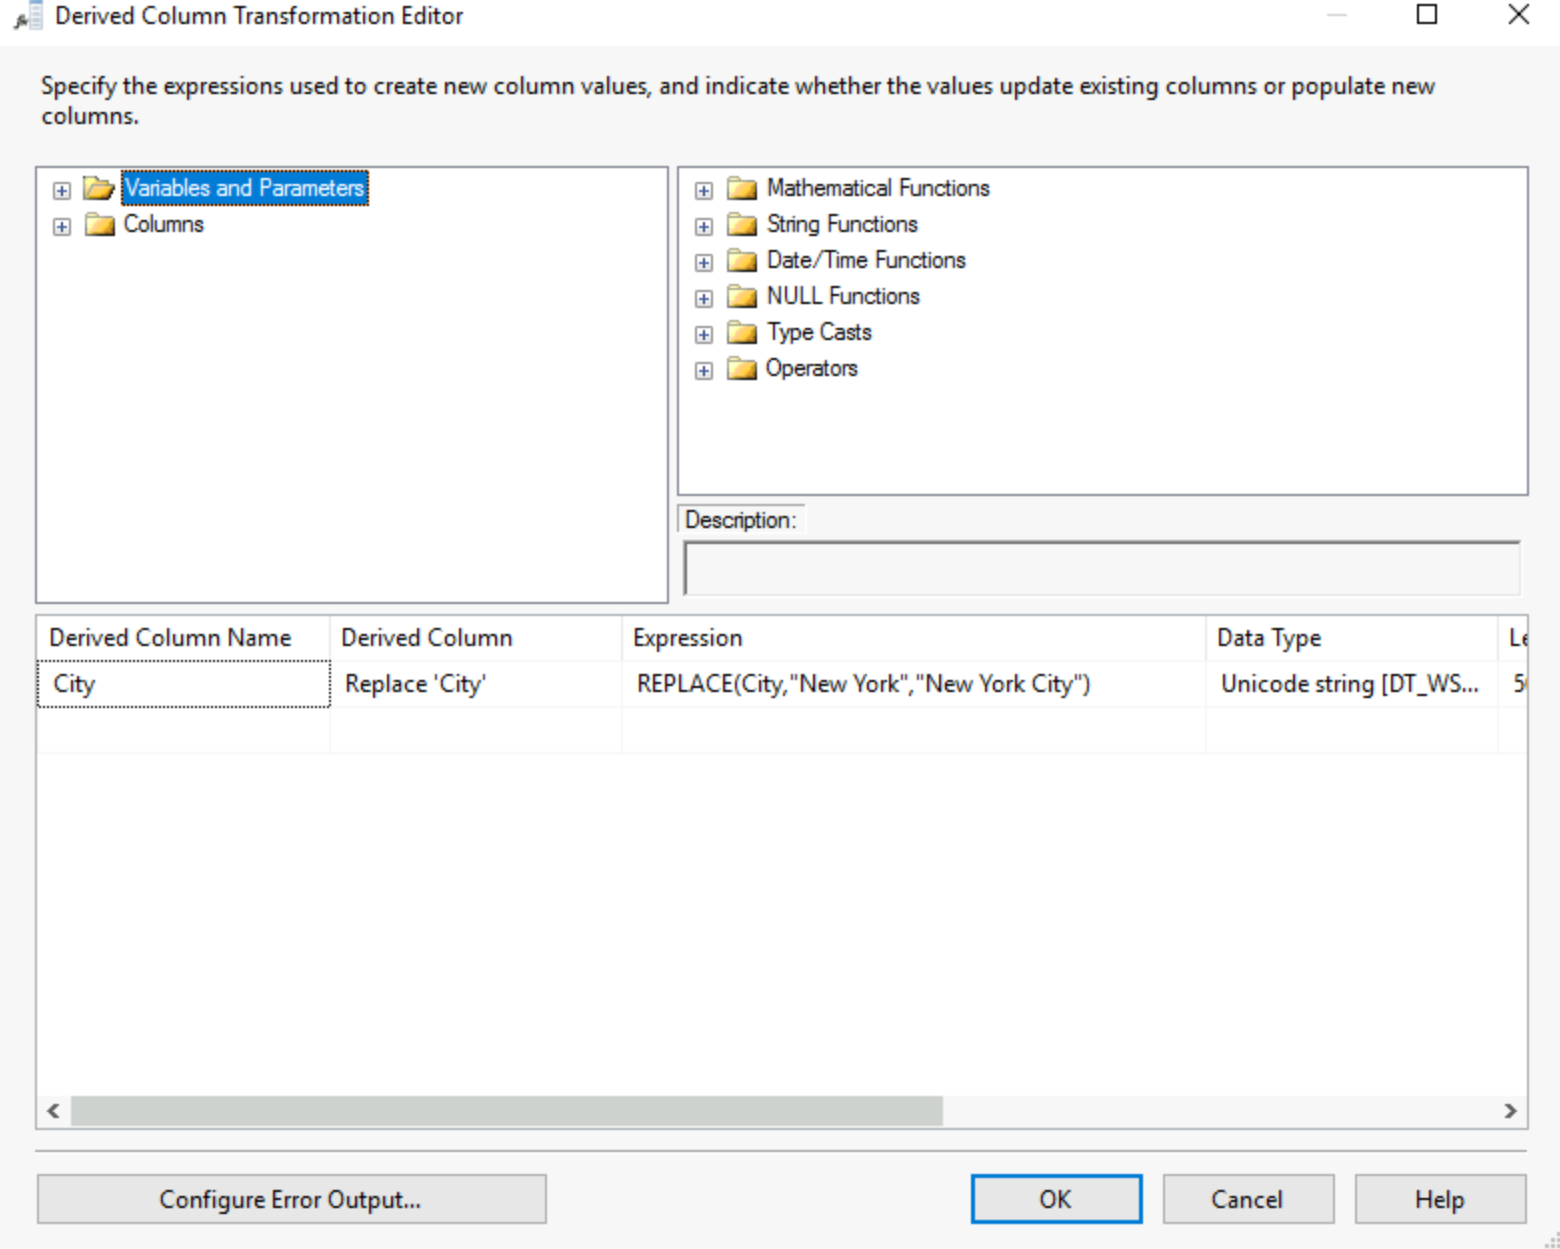
Be careful with the data types entering this tool as not all expressions and functions will allow all data types.
7) HDFS File Destination & File Source
These two tools permit the connection to Hadoop Files System. Both for extracting data and loading it there.
8) Lookup
It basically works like a JOIN, the idea is you can reference a dataset via a specific column. I believe it is a strong tool for data extraction and data validation in case we want to verify that the flow is returning the supposed outcome. It works using an Ole DB connection, so the first step will always be to set up that connection.
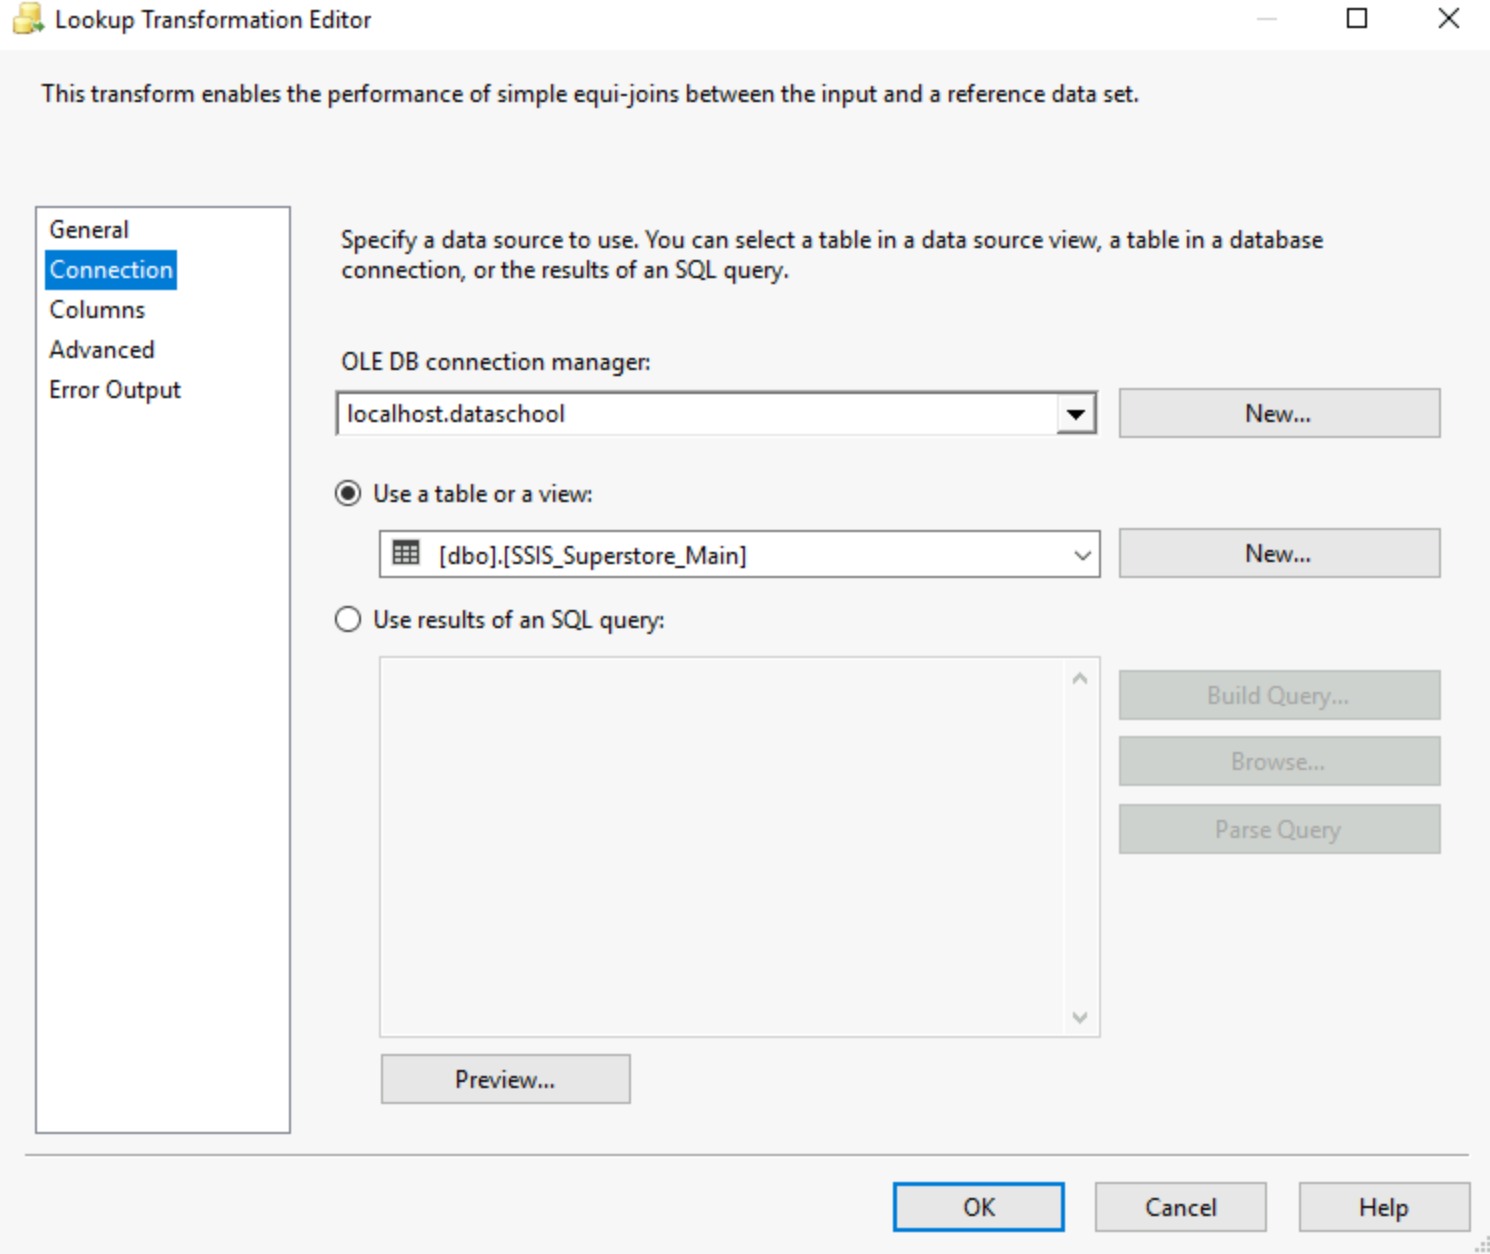
You can then go in the columns tab, let's say we have a database with all the cities where our superstore is, we can use the lookup to verify we obtain the data from all the cities. To do this we just pick city from both our input and the lookup columns form the Old DB table. You will have to drag the city from the input onto the city from the lookup table. This is followed by choosing which new fields you want to see appearing from the lookup table.
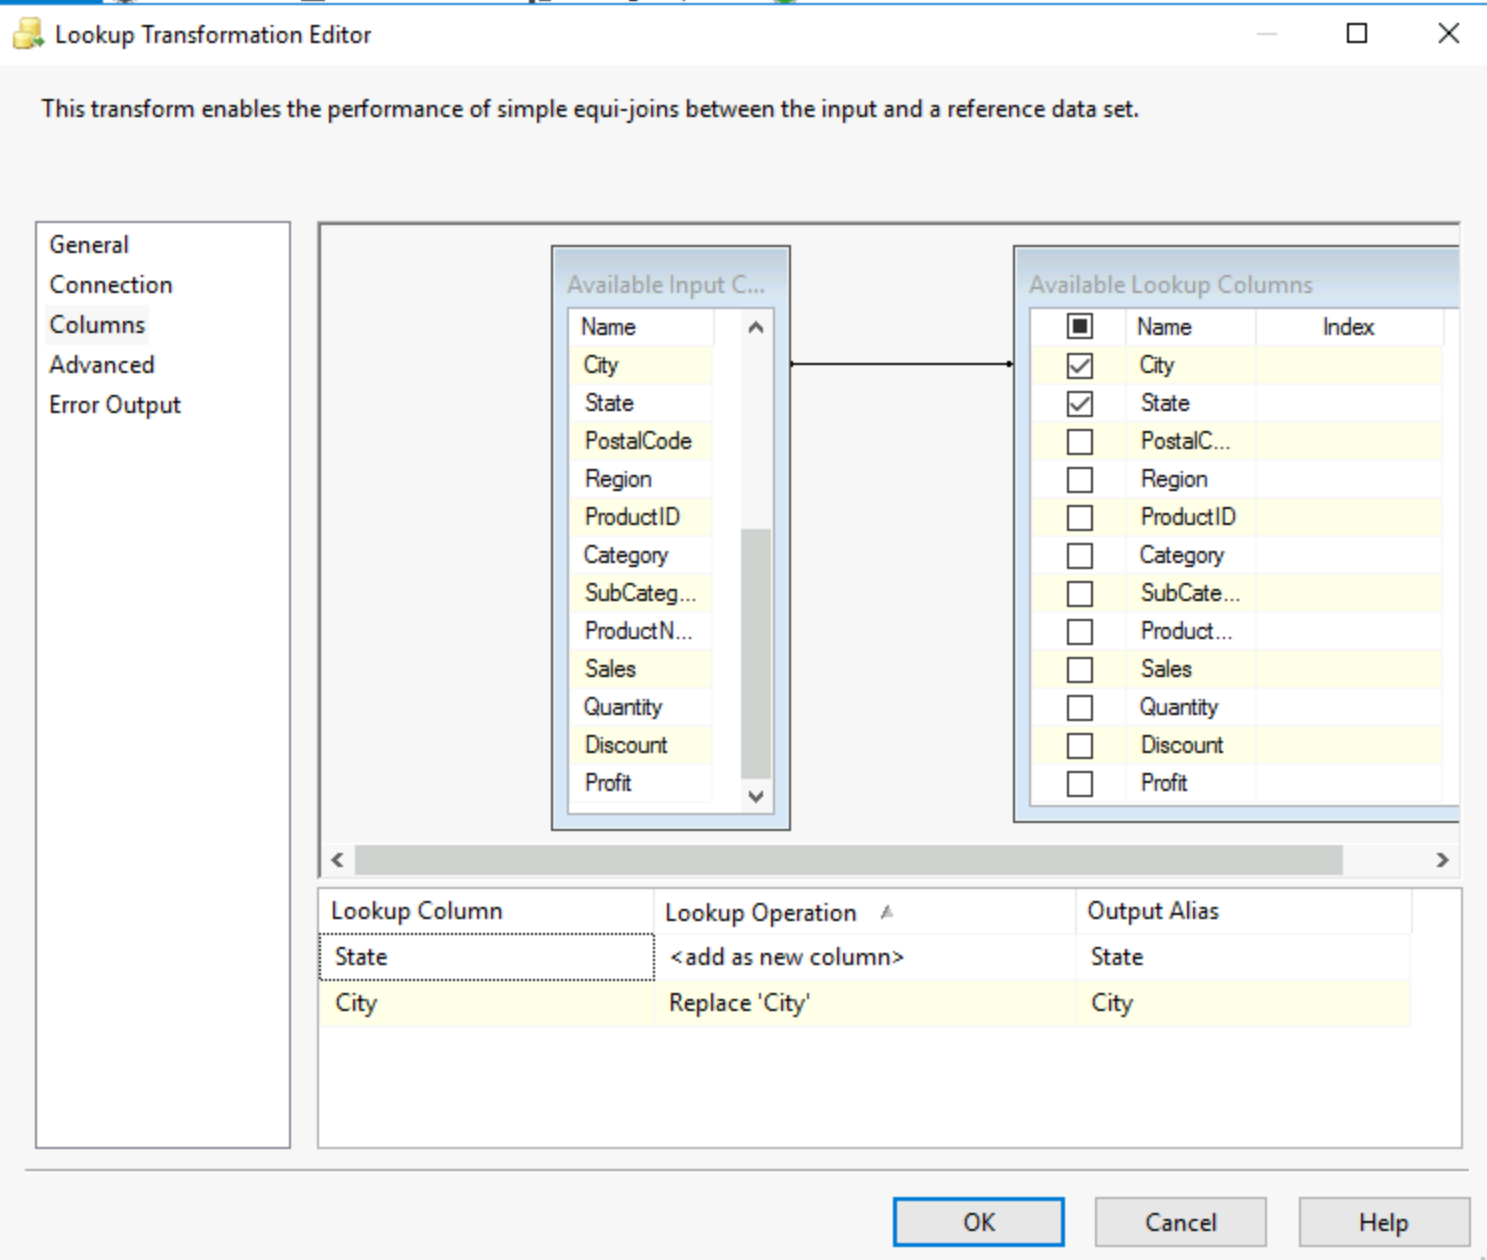
Any rows that do not match can cause an error, be ignored or be redirected to the error output. This is selected in the error output tab.
9) Sort:
As the name suggests it, you can sort your data based on the values in one or multiple fields. This is required when you want to use the next tool, the merge.

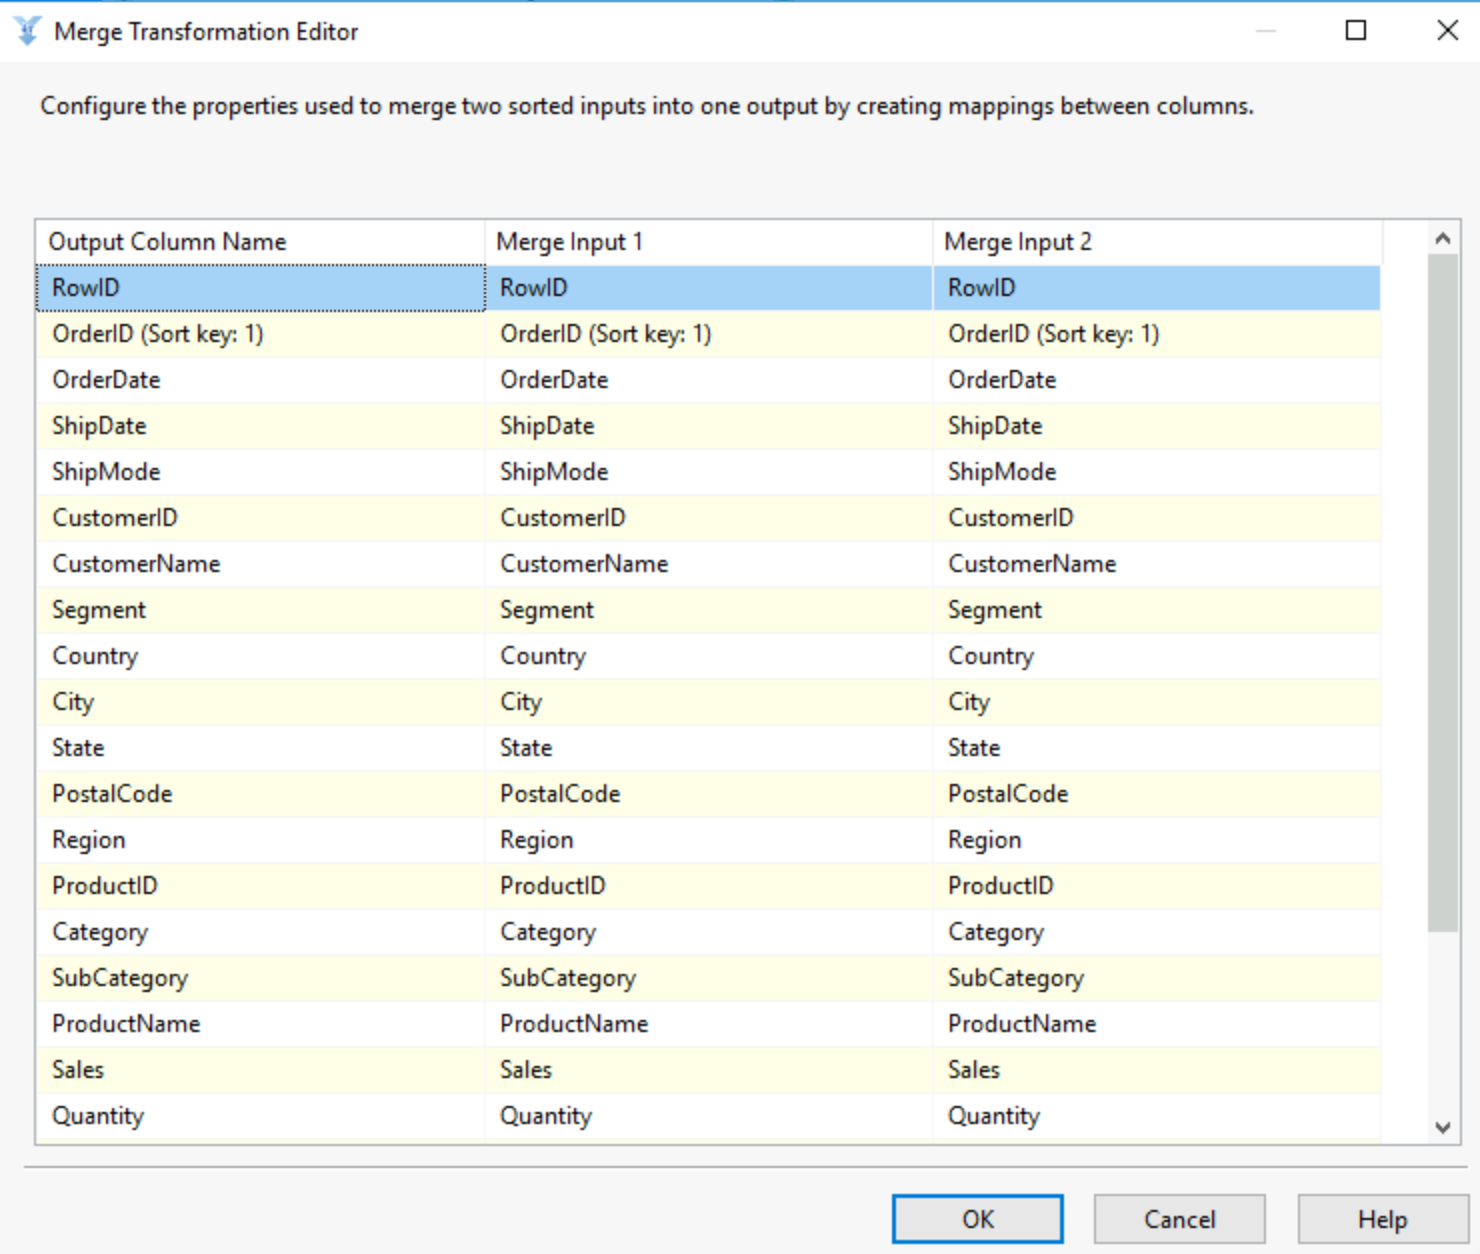
10) Merge:
The merge essentially is a Union between two data sources, you have to make sure that both are sorted for it to function. Once you have two sorted datasets, they both enter the merge, each in one of the inputs, you have to then align the columns of both your tables to allow the tables to merge. Once done you have a union of your two tables.
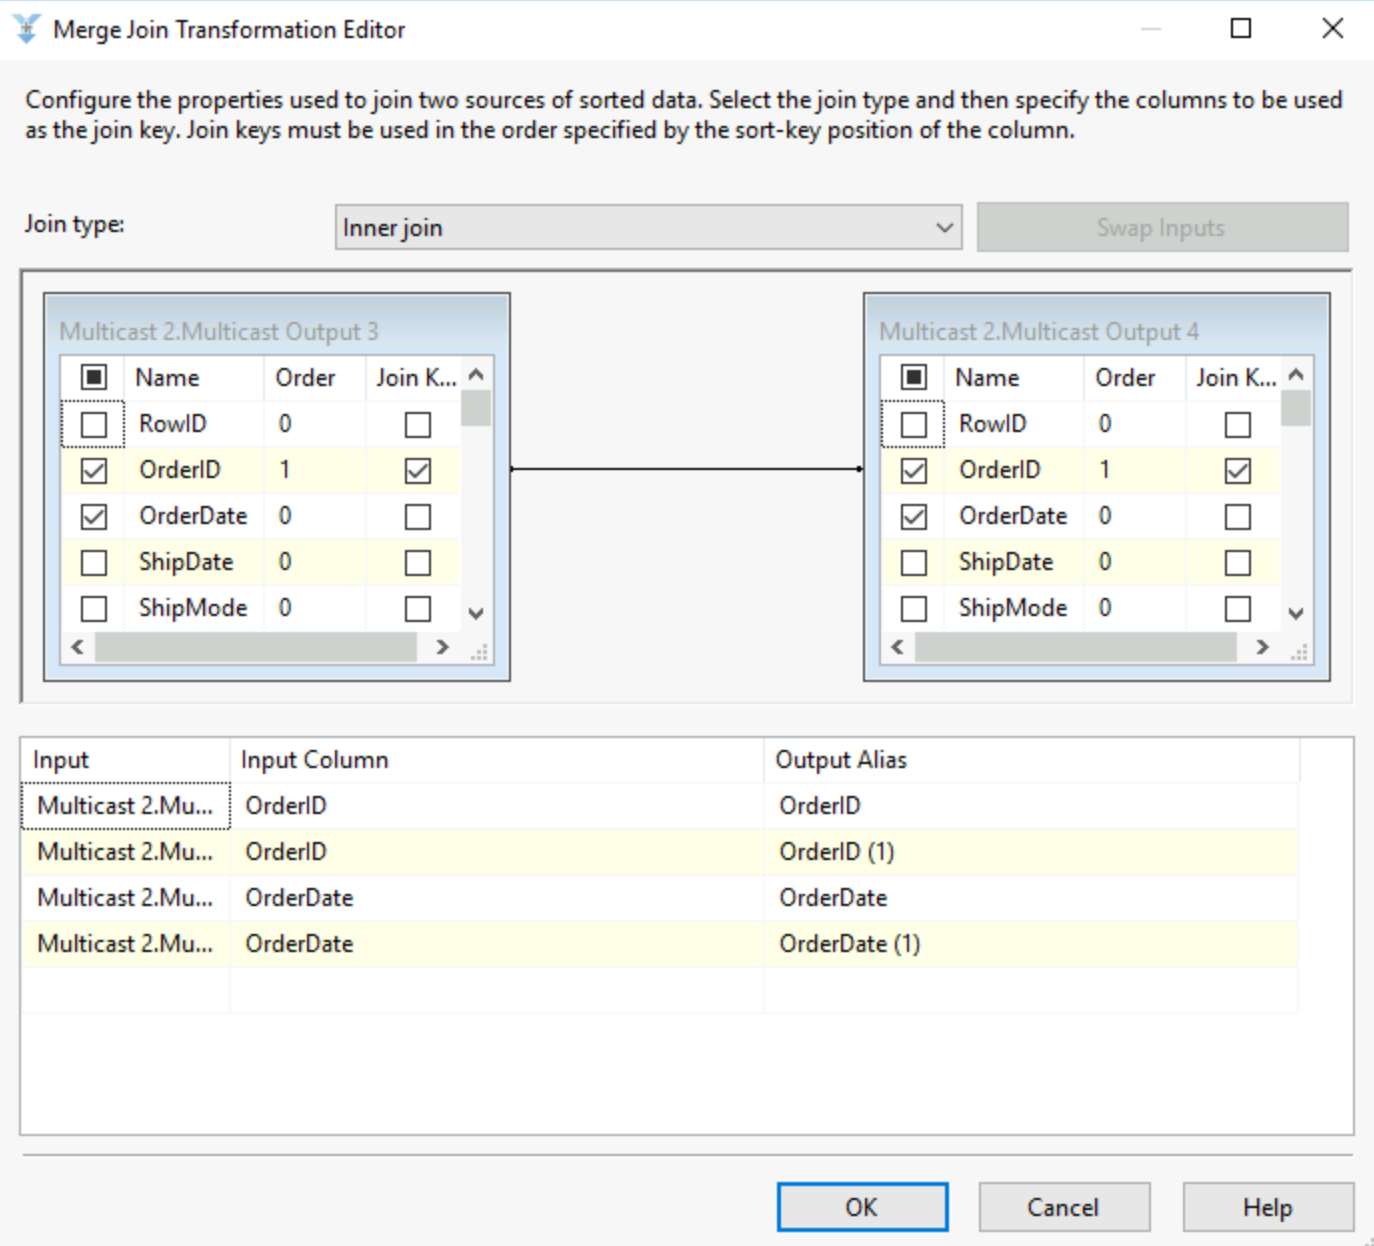
11) Merge join
Just like the merge, this tool required you to sort your data on the same column, this will be your join column. Then the merge join tool allows you to select a join type and select the fields you want to return and to rename them.
12) Multicast
As tools in SSIS only allow for one output (most of the time), this allows you to create as many outputs as you want from a tool. Meaning if you required the same data in multiple tools, you can just use a multicast to make your workflow function. It is an essential tool to most workflows.
13) OData Source:
This allows SSIS to connect to a OData feed, for example SharePoint lists or Azure Data Services. You will have to provide the URL of the feed and an authentication method which can be OAuth. You will then be asked which tables in the service needs to be extracted. The connection works similarly to the other source tools, including a connection manager and a columns tab to visualise what is being extracted.
14) ODBC Source and Destination:
This allows you to connect to different databases for extractions and loading as long as they use an ODBC driver. This works similarly to other source and destination tools with a connection manager followed by a columns tab to select columns to extract or to load the columns in the right fields of the loading destination.
15) OLE DB Command:
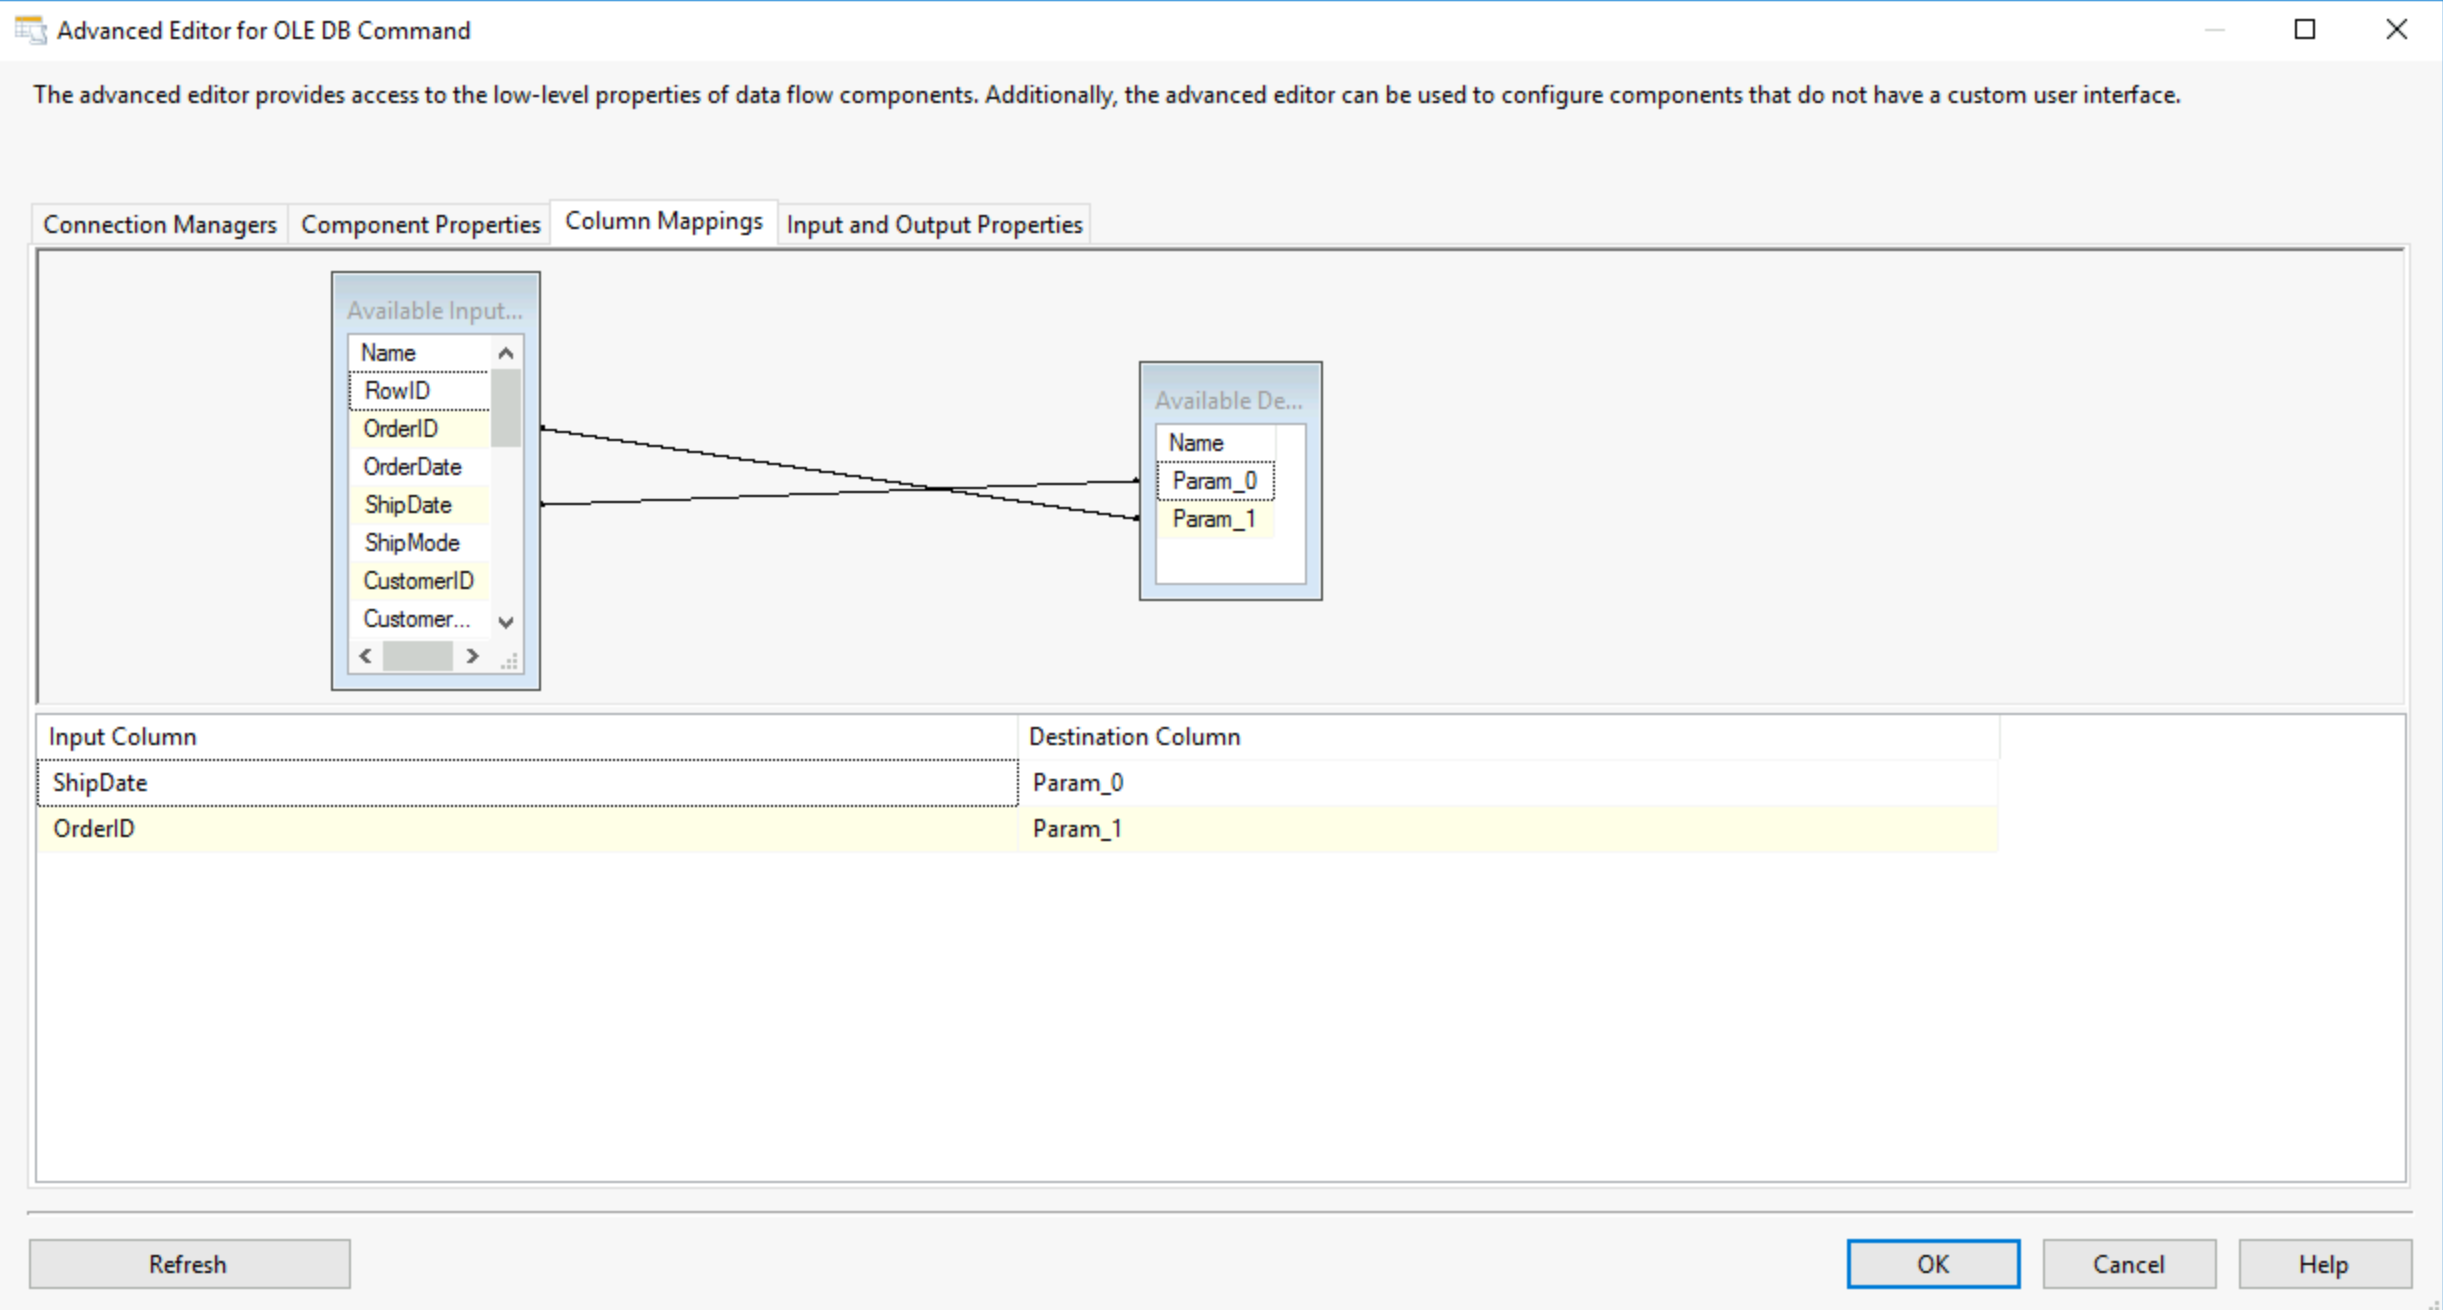
This tools allows you to run commands from your DB, for example from your SQL Server. You use the connection managers to connect to your database and then the component properties tab to set your sql command, in that SQL command you can set up parameters by replacing anything with a ?. You then need to assign for each parameter a column from your data input. Meaning that you go through each row of your data and the parameters will be the value for the fields you set up each parameter to be.
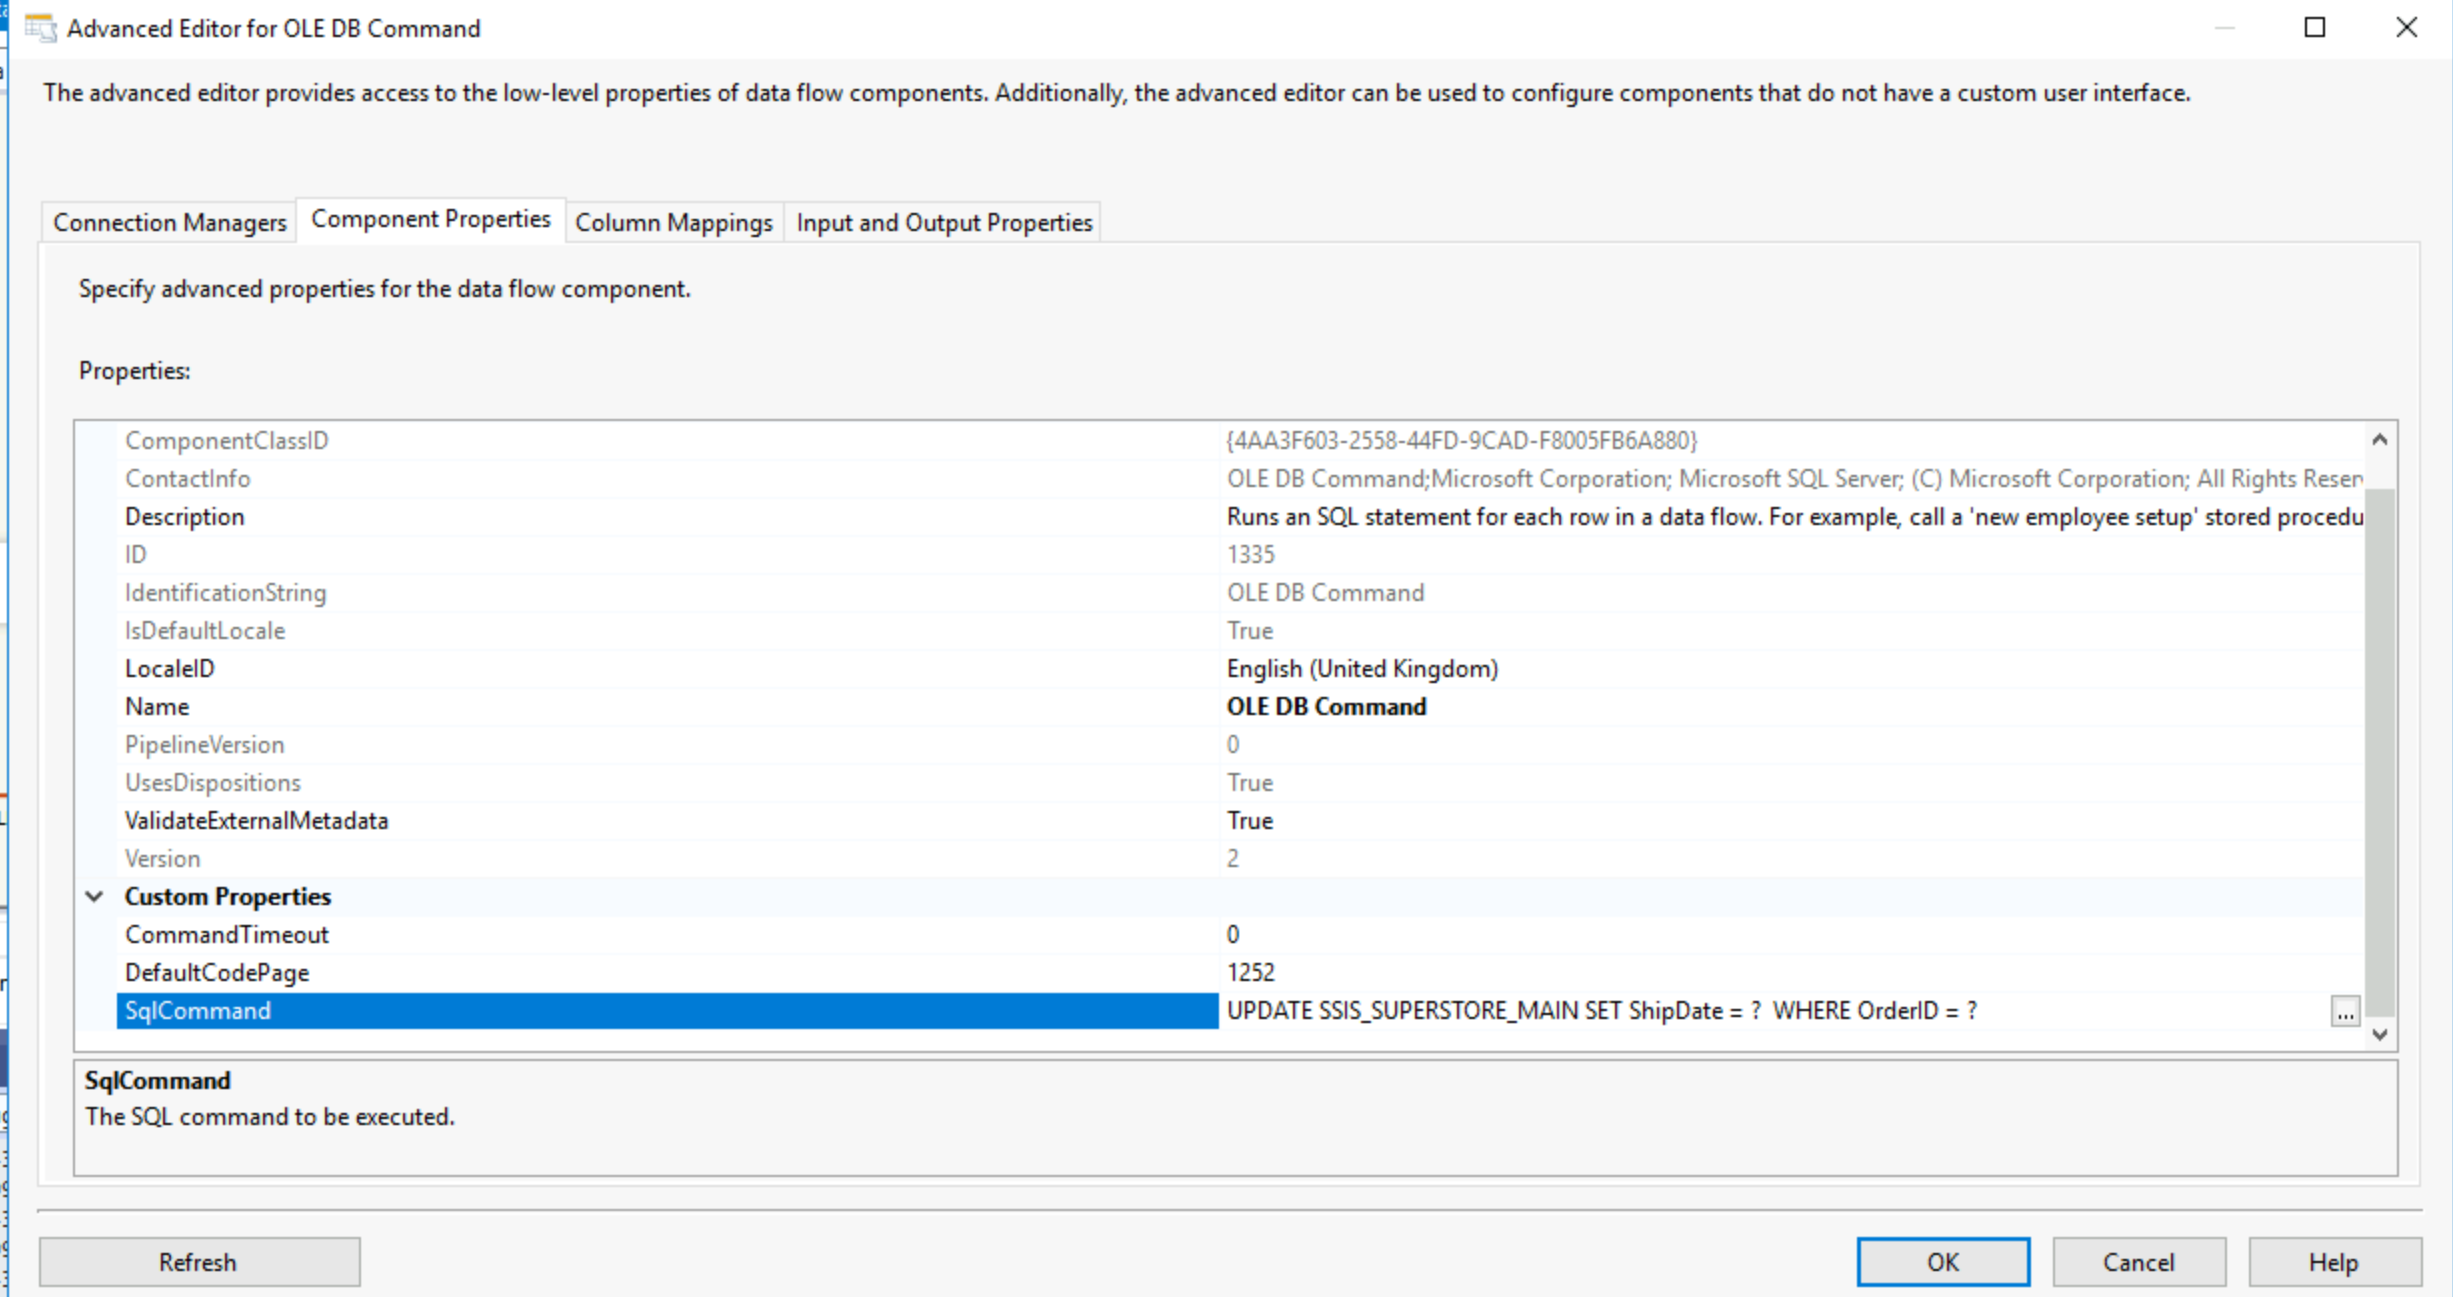
Here our parameters are ShipDate and OrderID so in the column mapping tab I will have to use those as parameter 1 and 2 respectively.
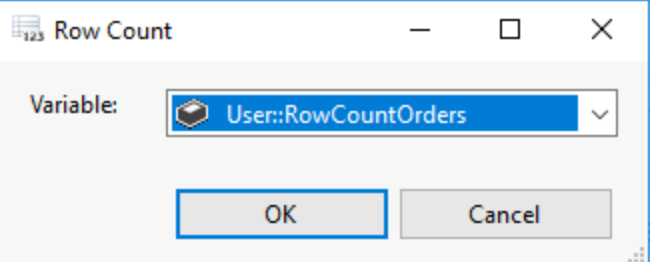
16) Row Count:
Row count creates a variable which as the name suggests is the count of rows in the data. This variable can then be used later in the control flow. Here is how to use it:
First you will need to right click the control flow canvas and select variables, this opens the variable menu, you might need to expand it as it opens very small.
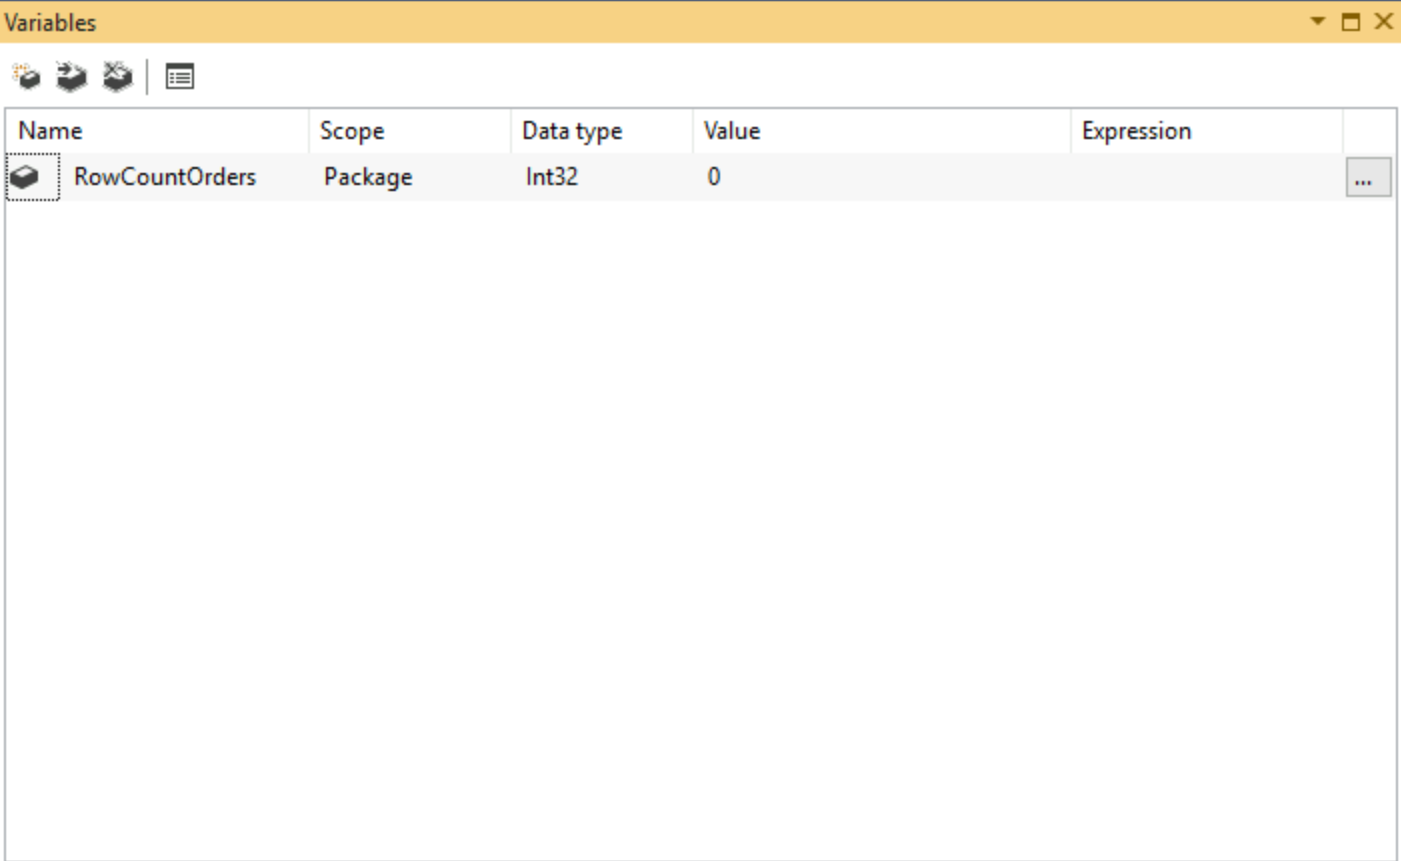
This variables is set to take the value of the number of rows from our orders table. Then in your data flow, you can put your row count tool and double click it. Your row count orders variable will be in a dropdown and when you run the flow it will obtain the value of the row number.
17) Script Component:
The script component allows you to write C# scripts to transform your data. You will have to define if you want to use the script as a source or as a transformation. You will then be able to just like in the OLD DB command tool, write your script to perform transformations.
18) Slowly Changing Dimension:
Let's say you have an attribute like a customer's address, that can change but won't change at every order and probably will remain the same. This tool will handle three types of changes, either overwrite the older value, or keep a history and add a new row with the new value, or track the history in the same row with a new previous address column. You first need to select a business key, something to identify your customer by in our case.

Then pressing next lead to selecting from other columns, how we want to track changes between the types I mentioned earlier.
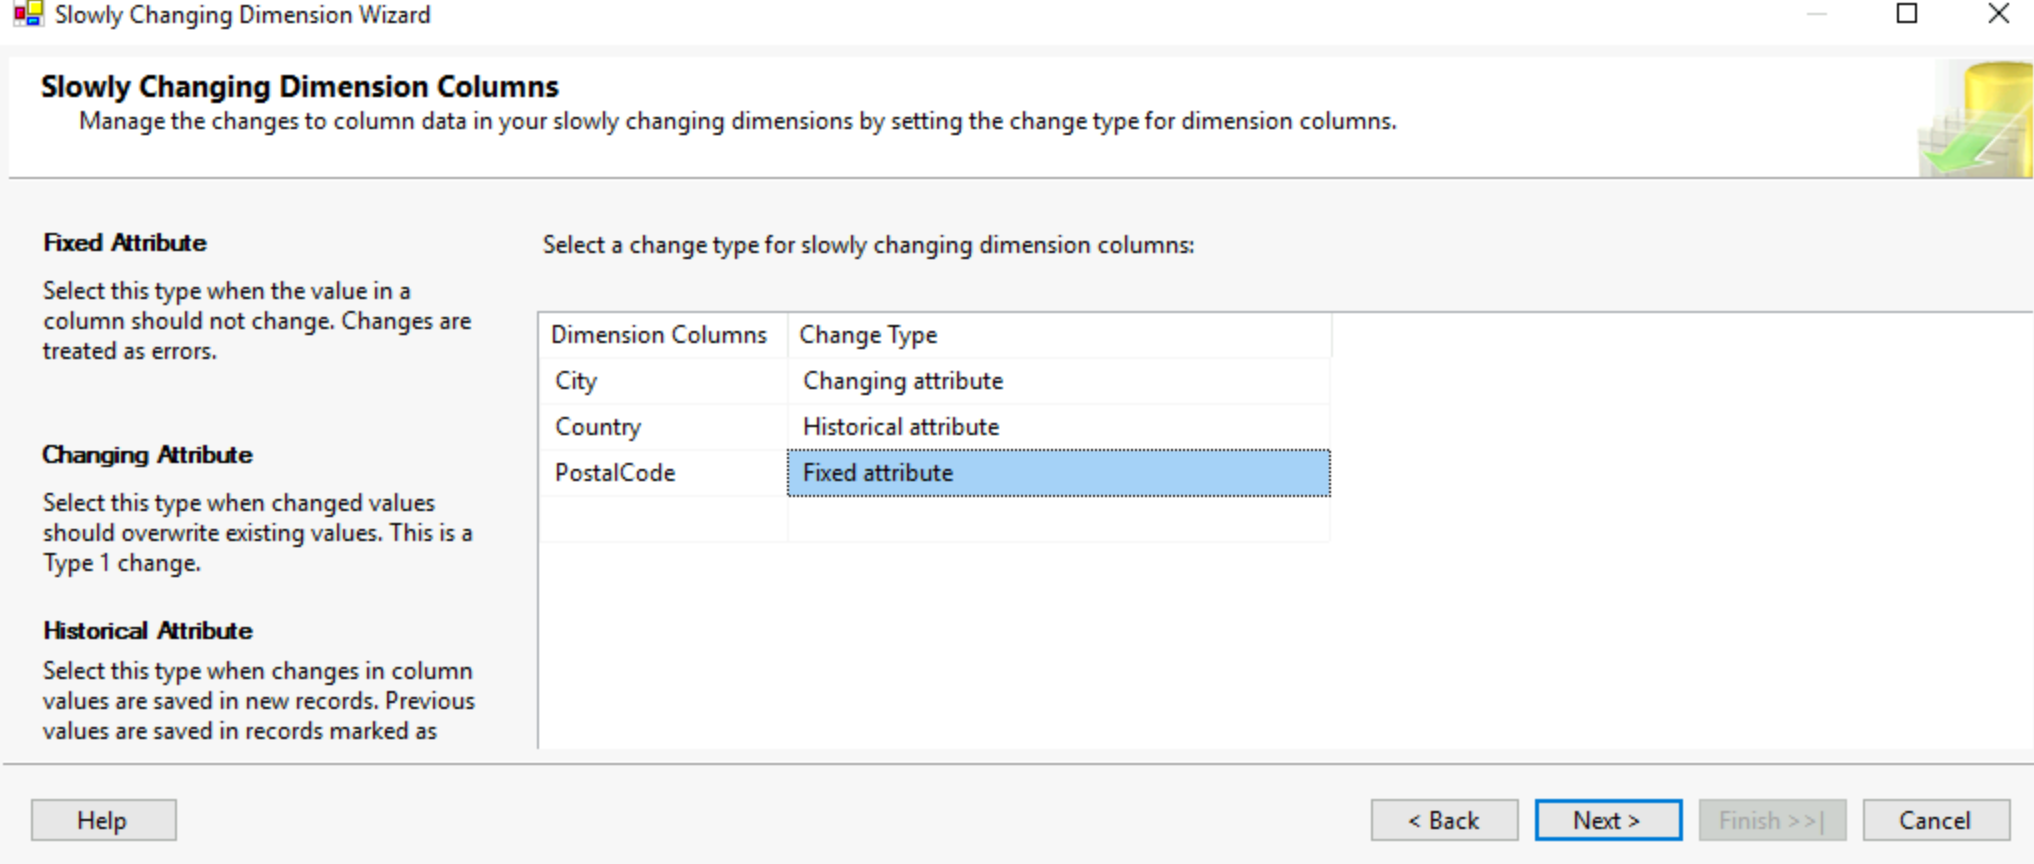
This will automatically create a dataflow for all the tools and set up required to create a slowly changing dimension table. Be careful tho, this crashed my visual studio when attempting it.
19) Union All:
Union all works similarly to the merge union tool as it will union two or more datasets into a single one. However, the union all tool does not require a sorted input. The columns must match in name datatype and order to make using this tool possible. Once you've dragged your multiple inputs into the union all tool, simply double click it and make sure your columns are correctly aligned!
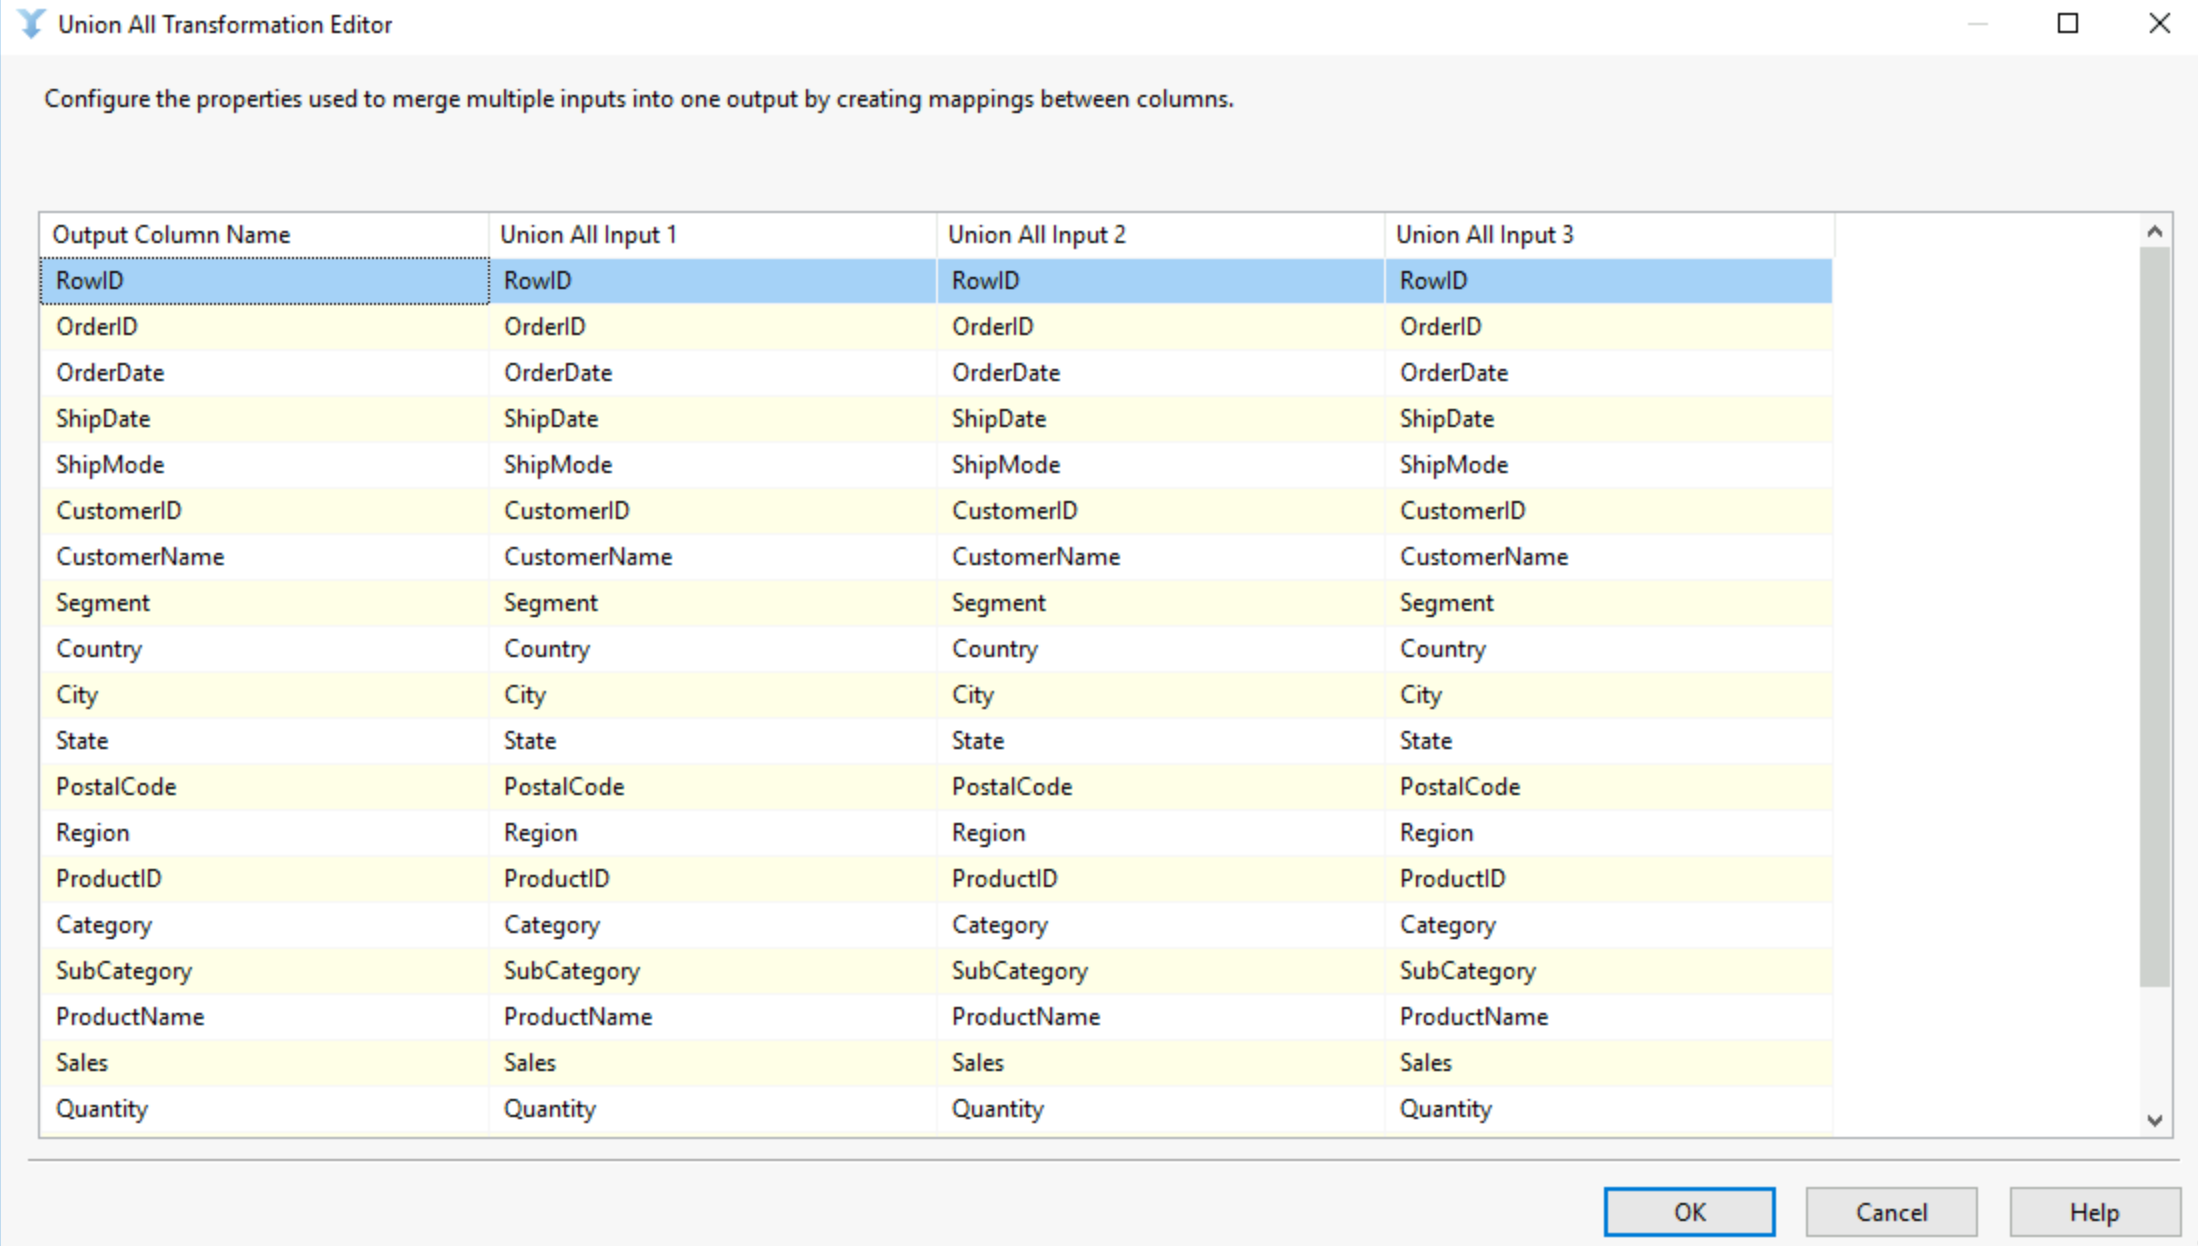
The different with the merge union tool is that ability to have more than 2 inputs and the idea that your data will not be sorted when you run your flow.
This are the common tools in SSIS, some I believe have a greater potential while some are niche to specific Microsoft use cases.